Monday 31 January 2011

'Use It Up' update, A Confession, And Review?

Hi everyone!

I thought I would do an 'update' of my 'use it up' challenge, as it has been a few weeks since I decided to start it, and although I have found it quite easy on the hair and body product front, I have been struggling a little bit on the cosmetic front, hence the 'confession'.
I am actually quite suprised that I have found it challenging (haha!), as I didnt think I bought much makeup, but I guess I was wrong! 
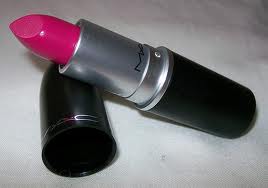
Okay, as I was breaking my ban, I thought I would make it worthwhile, so I bought (my first) MAC lipstick!
The shade is Girl About Town and its a gorgeous deep pink colour. This has been on my 'lust list' for awhile and as I was going on a night out for my sisters birthday I thought, 'why not'. (and I have just been paid, which was a major contributing factor!)


The Lipstick set me back £13.50, which is quite expensive, but after wearing it, I actually think the lipstick is worth its price - the pigmentation is amazing, and it last's ages without fading, even eating and drinking  and it didnt budge! You only need to apply one coat to get the finish in these pictures:


Other than my new-found love for MAC products, the challenge has been going well, and im liking how my bathroom cabinet is slowly but surely gaining space.
As Iv been using up products, i've discoverd some hidden gems,which I most definately will repurchase once I 'need' new products, as well as coming across some truly horrible/useless products which have swiftly ended up in the bin.
In order to remember which products I loved (and hated), I decided to add them in 'love' and 'loath' lists in the sidebar of this blog, so I will remember which products were fabulous enough to re-buy.
This made me wonder, if I did a mini 'review', after each product I finish up, and mention what was good/bad about it, would this be helpful to anyone? Please leave a comment below!


Wednesday 26 January 2011

Homemade Energising Peppermint Foot Soak & Tutorial

Hi everyone!

Recently, I have gotten interested in, and have started making, my own beauty and body products, such as soap, face/body scrubs and bath melts, milk and bombs, and I thought I would share the pics and tutorials once I have tried and tested them out a few times. One of my favorite homemade products that I have been using is my homemade energising deoderising peppermint foot soak.


The foot soak can be used with some oil (baby oil, almond, olive, coconut oil) to make a foot scrub, but I find it luxuriously relaxing (but at the same time energising, due to the peppermint scent) doing a mini spa-like pedicure, which really does help my tired feet feel soft and refreshed!
I would start by removing old nail polish, while allowing a few spoonfuls of the crystals to dissolve in a bowlful of warm water, then put both feet in the bowl, allowing the water to soak and soothe your feet for about 10 minutes, whilst you relax with your favorite book/magazine/the soaps/knitting, and a glass of wine :)


After your 10 minutes is up, gently pat feet dry with a warm, fresh towel, and remove any dry skin or ridges using a foot buffer or ped egg (these ped eggs actually make me cringe! *shudders) and cut nails.

Apply and massage in a liberal amount of foot moisturising cream, and put on a pair of soft cotton socks and keep them on overnight, to maximise the absorbtion of the moisturiser. The next morning, wake up to perfectly soft tootsies!


The foot soak is really easy to make, and only uses three ingredients:


Get a clean jar or container, add the rock salt about two thirds full, add a couple of drops of food colouring (if required) and shake shake shake!
Once the colour has evenly distributed, add a few drops of the peppermint essential oil and shake again. Then you have a cheap-but effective, homemade foot soak!
Just add oil to make a foot scrub.

To make a gift of the foot soak, just hang a small scoop from a pretty ribbon and  attach to the neck of the jar, add a cute label to the front, and an instruction label on how to use the soak to the back of the jar, or something like in the pic below, and voila!


Have you made any homemade beauty products?

Sunday 23 January 2011

Blog Awards!

Hi everyone!

Guess what? The lovely Alice at Pretty Wonderful  pretty--wonderful.blogspot.com awarded me not one, but TWO lovely blog awards, so thank you very much! Alice's blog is fabulous, so I recommend everyone go over there, check it out and follow!
The first one She awarded to me is 'The Versatile Blogger' award:


The 'rules' around recieving this award are as follows:

* Thank the person who gave you the award and link back to them.

* Share 7 things about yourself

* Pass the award on to 7 recently discoverd blogs that you enjoy reading

* Leave your recipient a note telling them about their award.

Here are 7 things about me:

1) My star sign is Gemini and I share my birthday with my brother.

2) I can play the piano, and would love to take up lessons again.

3) Aged 13 (pretending I was 15), I did a 180 foot bungee jump. I was terrified!

4) I have been engaged to my gorgeous fiance Simon for nearly 6 years.

5) I own two sets of Tarot cards, stuff like that has me fascinated.

6) I have 4 brothers and two sisters, which make for an expensive Christmas!

7) When I was little, my family used to own a pony, and I would love to have one again at some point.

Picking blogs for these awards was soooo hard, as there are tons of amazing blogs that I regularly read and would love to give them this award, but after much thought, the 7 people I tag for this award are:

1. Alice (an alien world) pookie-shoegal.blogspot.com/
2. Kelly at www.kelanjo.com/
3) Sharonmanc at onelifeand3kids.blogspot.com
4) Leah at look-flyingmonkeys.blogspot.com
5) Angie at bumblebeescraftden.blogspot.com
6) Katie at blueberriesnstrawberries.blogspot.com
7) Lady Cherry at ladycherryloves.blogspot.com

If you dont already, check out and follow these lovely blogs :) 
The 'Rules' for the second award, 'The Stylish Blogger' are the same as the above, so I will use the above '7 things about me' (yes, Im going to be that lazy!)


Again, this was soo difficult, but the 7 lovely bloggers I give this award to are:

1) Pippa at Fairy Dust www.blogger.com/profile/03989368138244483129
2) Giddynici at giddylittlemiss.blogspot.com
3) Robyn at eyelinerandspraypaint.blogspot.com
4) Alex at  Odd Socks And Pretty Frocks blogger.com/profile/11337968500120821387
5) Danni at dannithegirl.blogspot.com
6) Lil at lilyribbons.blogspot.com
7) Carla at messycarla.blogspot.com

Thanks again for my lovely awards Alice!


Wednesday 19 January 2011

Milk Chocolate Orange Cake Tutorial (its not Terry's, its mine! :)

Hi everyone!

As there are a lot of family and friends birthdays in January, all I seem to have done lately is bake chocolate birthday cakes (not that I need an excuse!) and as the finished cakes are really yummy, I thought i'd share the photo's and recipe with you all so you can make your loved ones a lovely scrummy cake (or keep it for yourself, as after all, to quote Ms Cole, we're worth it!) and this cake is most definately worth the effort :)

okay, the recipe is from The Be-Ro Home Recipes 40th Edition book


 This is what you will need:


INGREDIENTS:

chocolate cake:

200g  Self Raising flour
225g  caster sugar
1/2     tsp salt
25g    cocoa powder (sieved)
100g  margarine
2       eggs
75ml (or 5tbsp) evaporated milk
75ml (or 5tbsp) water
few drops orange essence

butter cream filling:

100g margerine/butter
200g sieved icing sugar
orange essence as required.

milk chocolate icing:

60g margerine
1 tbsp cocoa powder
250g icing sugar sieved
3 tbsp hot milk
1tsp vanilla/orange essence

Although the recipe seems to have a lot of ingredients, they are mainly the same ingredients used over and over.

METHOD:

1. Heat oven to 180 electric/fan oven, or gas mark 4. Grease 2 x 8n inch tins (not loose bottomed, as the mixture will run out)


2. Measure out and mix together the flour, salt,sugar, and cocoa in a large bowl


3. Add margerine, and rub in until the mixture resembles breadcrumbs


4. Beat eggs and evaporated milk and stir the egg mixture, orange essence and liquids into the dry mixture. Beat well.


5. Place mixture evenly into the two prepared tins (dont worry if the mixture looks too runny, its supposed to look like this, and helps to make the cake lovely and moist) and bake for about 30-35 minutes, until a cocktail stick inserted comes out clean. While the cakes are cooling, make up the butter cream filling.


butter cream filling:

1. Cream the margerine/butter, gradually adding the icing sugar, and cream both together, so it looks thick and creamy.


2. Add the flavoring and/or colouring. use this mixture to spead on to one of the cakes, then sandwich them both together. Then make the milk chocolate icing to cover.


Milk Chocolate Icing:

1. Melt the margerine, blending in the cocoa, then stir in the icing sugar, milk, and orange essence.

2. Beat untils mooth and thick, then spread evenly over the cake. set aside to 'set'.

3. time to decorate and eat the scrummy cake!


Let me know your thoughts if you make this cake! What is your favorite cake?


Saturday 15 January 2011

Bargains, Books and Advice Needed!

Hi everyone!

Whilst I was in Leeds City Centre this week, after finally having my dressings removed at the hospital (yay!), I happened to pass a charity shop and decided to have a lil' nosy inside (well, its almost rude not to, isnt it,?) and I couldnt wait to show you the bargains I came home with.
This mahoosive length of cotton fabric (that reminds me of the circus, and of deckchairs for some reason!) was only £1.99! Maybe I could add a few squares of this to my patchwork quilt? (Which I have finally started, pics to follow soon!)


Next up from the charity shop, is this stunning structured black pencil/wiggle dress that is very pin-up in style (with the dress being black, it doesnt photograph too well, so I included a close up of the detail, and how it would look when worn - the fit is very similar to the dress modeled in the picture below, think Dita Von Teese) and the price tag was asking a measly £4.99 - I have seen this style dress sell on eBay for more than £25, so a great bargain I thought!


Moving along to the bookshelves (you can find some amazing books at fantastic prices in charity shops, I highly recommend you check them out if you dont already, there is something so exciting about second hand book shopping, I get that giddy butterfly-feeling when I am searching a randomly packed dusty bookshelf, then discovering a hidden gem) 
I came across these books that I simply couldnt NOT buy, the titles say it all:


One of the books, 'A Guide To Elegance' is written encyclopaedia style, has the author's entries for every fashion dilemma starting from the letter A, right through to Z -  I was simply amazed and delighted to find as I already have the 'matching' book, 'Elegance' - which is a fictional story about a bored married woman who finds the above book 'A Guide To Elegance' in an old book shop and after reading it, basically changes everything about her humdrum life, and tries to become everything the book says she should be. (I wont go into too much detail in case you want to read it, which I definately recommend for you chic-lit fans out there!) but they are both great books.


The 'Things To Make And Mend' book looks great, as does some of the recipes in the 'Gifts from the Kitchen' book, after glancing through this one, im sure that pictures and tutorials will be posted soon :)

On my way to the bus stop, detouring through Leeds Markets, I passed a stall that were simply giving away some very cute white-with-red-heart-detail curling ribbon at just 10p per each 10metre roll (so I bought all 14!) as well as these red christmassy glass candle holder/stands also at 10p each, bringing the grand total spend at said stall to a whopping £1.80! Bargain!


The 'advice needed' from the title refers to my sewing box/table (I have mentioned this in a previous post, but i've posted a reminder picture of the table below) that I am going to customise by painting it (colour of paint depending on the choice of paper) then papering the top and possibly sides, but I cant decide (out of two) which paper to use. This is where (hopefully!) you lot come in!


The paper of choice has been whittled down to the following two:


What do you think? I simply cannot decide between them, so your help and advice is much needed please!

Tuesday 11 January 2011

I Heart Teacups

Hi everyone!

I was having a wonder through Google images, and I came across some fabulous pictures of  beautiful teacups that have been transformed in ways that have completely inspired me, (especially the teacup candle, I may have a go at these!)
I simply HAD to share them with you :)


                                             Aww, I just love this doggy bed!

                     For some reason, this picture reminds me of Alice In Wonderland!

                                                  I adore teacup candles!


                                                      pin cushion <3

                                                 cake topper teacup

fish for tea?

                                                        soooo pretty!


                      I love this! how amazing would this look on your kitchen wall?

                                                      This is lovely!
                                                how sweet is this bird table?


                                                    this is stunning!


How amazingly inspirational are these pictures? And who knew that teacups could be so versatile?
(I think my gluegun will be getting some action now i've seen these :)

Have you transformed an everyday object into something completely new and beautiful?